Recording and Editing with Audacity
This tutorial is appropriate for recording in one of our Story Labs or using our audio and podcasting kits. It can also be used by anyone with access to Audacity.
Audacity is a free, open-source software designed for audio production. It can be used easily with knowledge of a few key steps.
Recording
First, let’s take a tour of the toolbar to identify some helpful tools for recording
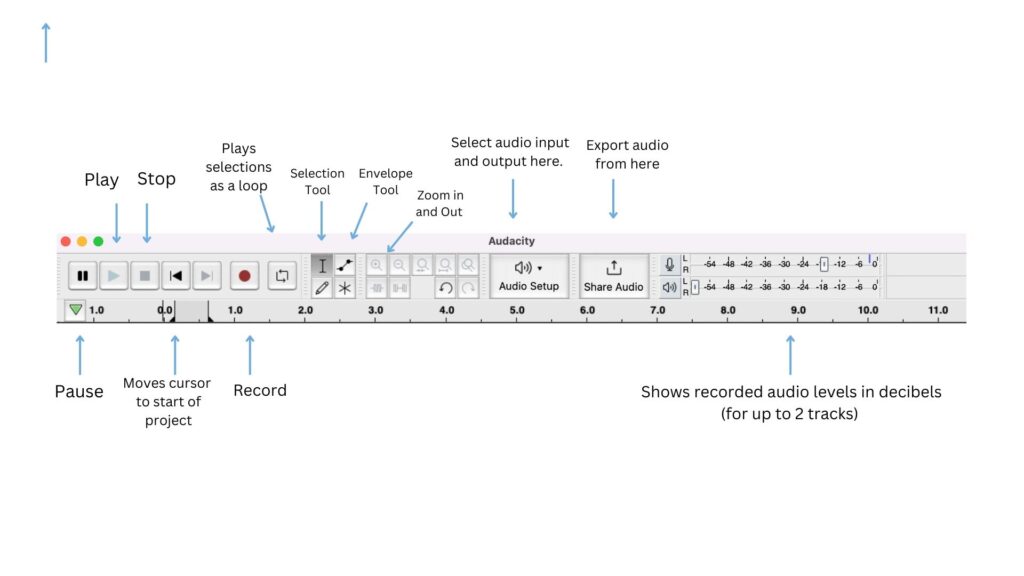
Recording:
- Check your mic(s) and make they are connected to Audacity as your preferred means of recording.
- Under “Audio Setup” in the toolbar, check that your input is the mic you plan on using and your output is the headphones or speakers you plan to use to monitor your recording. Alternatively, you can check this. By looking under “Devices” in “Preferences” where it’s labelled “Playback” and “Recording.” Click “ok” and return to your session.
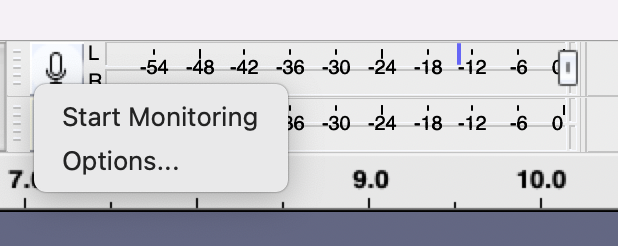
- Check and monitor your sound levels. With headphones on, practice speaking into the mic and adjusting the “gain” dial on your Focusrite. This will adjust the strength of the audio signal you’re recording. In Audacity, you can click the microphone symbol in the top right of the screen and then “start monitoring” to monitor your audio. There, you’ll see the audio level of your recordings measured in db (or decibels). Good sound is in the range of –12 db.
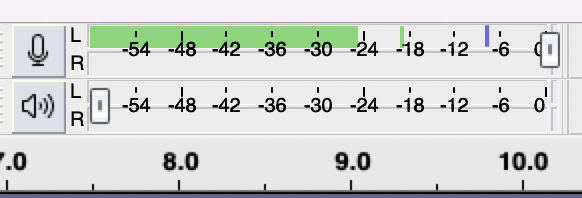
You can capture good sound by sitting or standing no further than 6 inches away from the mic.
You can find other tips to use the mic effectively here.
- Save your session!
- Click “File” and then “Save project as” to name your file before you begin. Click “ok.”
- To record one microphone on one track: In the toolbar, select “Track” and then “Add new.” Add a “mono” track. [“Mono” sends all recorded channels to one channel in headphones whereas “Stereo” sends one channel to each ear].
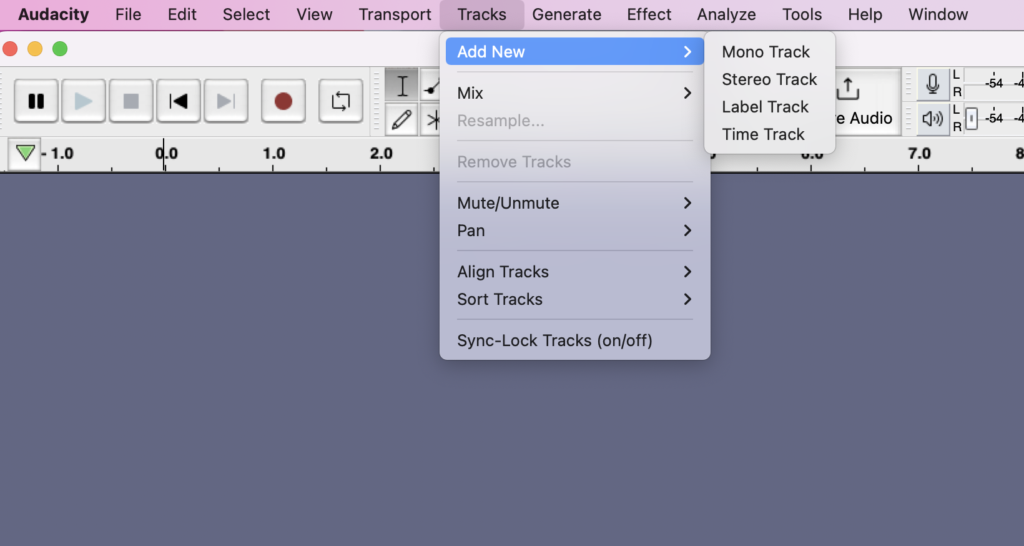
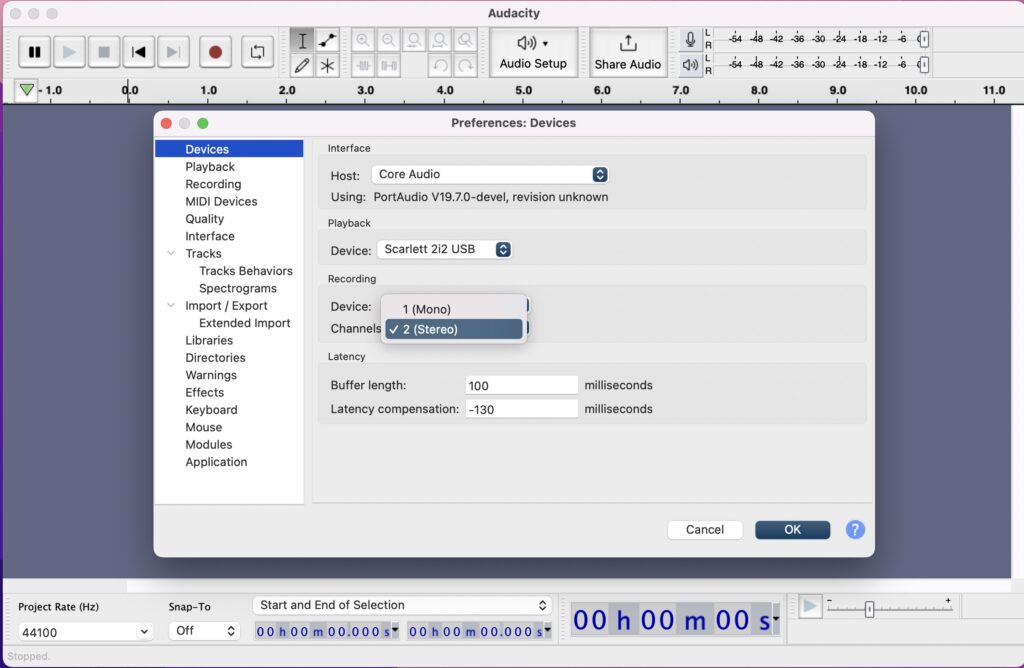
- To record two microphones on two separate tracks (this is preferable for interviews, etc.): select “Tracks” > “Add New”> “Mono” in the toolbar. Do this twice, to create one track for each microphone input. Then, click on “Audacity” in the top left corner of the toolbar and then “Preferences” and then “Devices.” Under “Recording” select “2 (Stereo)” from the “Channels” dropdown menu. Now, when you’re ready to begin recording, hit “record.” Each speaker will appear on their own track. To stop, hit “Stop.”
- Save! Always remember to hit “Save” throughout your session and back up your recordings (session track and wav files) on an external hard drive or cloud storage.
- To record, hit the red circle button. To stop, hit “stop” which is a black square symbol.
- Record room tone before you speak. Make sure to record 20 seconds (or so) of “room tone” or just the sound of the room with no one speaking. This will help you later in editing when you use “noise reduction” to remove the sound of the room (or external noise) from your recording. (see tutorial on noise reduction below for more information).
- Export when finished. To export your recording, go to “File” and then “Export” and select the file type of your choice. To share your file as a podcast or audio track, export as an “mp3.”
- Here is a brief tutorial that demonstrates how to export audio from Audacity: How to export Audacity files as MP3
Editing
The key to editing in Audacity is understanding the role of key editing tools that you can find in the search bar along with some commonly used effects.
Once you’ve recorded some audio, you’ll like want to make some cuts, move audio around, and even combine it with other audio as part of sound design, etc. These tips will help you get started:
Common editing commands:
- Cut (Control/Command X)
- Paste (Control/ Command V)
- Save (Control/ Command S)
- Split Track ( Edit > Clip Boundaries > Split) – this splits a single audio track at a point you indicate using the selection tool so that you can move the audio elsewhere or remove it.
Find more keyboard shortcuts here.
Common editing tools:
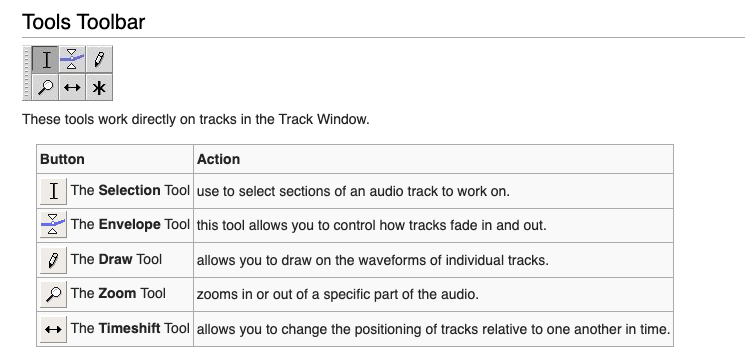
Here are some editing tools that will be helpful as you want to: shift audio across multiple tracks, select specific audio to cut, paste, copy, etc.
Editing Tutorials:
Explore this visual guide to see how the editing tools work together (UMASS). This guide demonstrates the selection tool, time shift tool, and envelope tool which are all helpful to know for most editing projects.
This video from the University of Virginia demonstrates all the key editing tools you’ll need to cut together a great audio story or podcast: Audacity Basic Training 2: Basic Editing [3.1+]
Common Editing Effects:
Compression softens the loudest part of your recording to reduce the difference between your recording’s loudest and softest moments. This creates warm (and better) sound. Here is a brief tutorial on how to use the compression tool in Audacity: How to use the Compressor in Audacity
Fade in/Fade out is an effect to smoothly transition into a podcast episode or audio story. There are multiple tools available in Audacity to create differents sytles of fade in/fade out. This brief tutorial demonstrates some of the most popular methods: How to fade in and fade out in Audacity
Noise Reduction. Noise reduction is an effect that removes extraneous room noise or “room tone” from a recording. If you leave space for room tone at the start of a recording, it is very easy to remove it later using this effect in Audacity.
Here is a helpful tutorial: How to remove background noise in Audacity
Normalize Audio. Normalizing audio adjusts the volume of your files without adjusting your range (or the difference between your audio peaks and low points. One reason to normalize audio is if you have different kinds of tracks in one project (for example, an intro, interview, and music transitions). Here is a tutorial on how to normalize audio in Audacity: How to normalize audio in Audacity
Further Resources
Want to use Audacity to edit a podcast? Check out this tutorial with tips on how to record, edit, and export a podcast episode using Audacity: How to Edit a Podcast in Audacity [2020]