Introduction to Metashape
AgiSoft Metashape is a photogrammetry application that can be used to create 2d or 3d models from images. For some examples of models created by the Trinity community see our collection on Sketchfab. You can download and install a fully functional 30 day trial for Mac or Windows here: https://www.agisoft.com/downloads/installer/
Getting Started
It is important to collect high quality images of the object to be modeled from different angles. When taking pictures keep the following guidelines in mind:
- Make sure images overlap by about 50-80%
- Take images from a number of angles including looking down from above as well as looking up from below
- Make sure to get images for every surface such as underneath overhangs or crevices
- Harsh shadows will not render well, try to take pictures with diffuse lighting or on an overcast day if possible
- Take more pictures than you think you will need. You can remove duplicates and only use the best images when you start the process.
- If you are modeling a small, movable object you can take a series of images, then rotate the object and take another series so that you get the bottom and all sides. You may even want a third position to be thorough. You can then merge these sections later in the process.
To create a model in Metashape you will mainly work through the steps in the Workflow menu. The necessary steps vary a little depending on the desired outcome – 3d model, orthophoto etc:
- Add Photos
- Check Image Quality
- Mask Images – Recommended for 3D models
- Align Photos
- Set Bounding Box
- Build Dense Cloud – No longer necessary but still useful in some cases
- Clean the Dense Cloud
- Build Mesh – for 3D models only
- Build Texture – for 3D models only
- Build DEM – for 2D orthophotos only – requires Pro version
- Build Orthophoto – for 2D only – requires Pro version
Add Your photos
To add images you can select individual images or add an entire folder. Once your images are loaded you can see them in the Photos tab at the bottom of the screen. Photos are referred to as cameras in Metashape. You can turn cameras on and off. If you want to remove a photo you can disable it or delete it from the project. Metashape allows you to group photos into “Chunks”. For most projects you will want all photos in a single chunk. If you have rotated your object you can try adding them all together in one chunk but you may be more successful by adding each series of images as a separate chunk as described below. If you choose to load all images into a single chunk you may need to mask the images to generate an accurate model.
Estimate Image Quality (optional – I usually skip this step)
After importing your photos it is a good idea to Estimate the Image quality to see if any are poor quality (less than .5) and should be removed. To do this look in the workspace pane on the left. Expand the items until you see your images under the camera heading. Right click on an image and choose “Estimate Image Quality…” In the next dialog box make sure to choose to Apply to All Cameras. Once this process is complete you can view details in the photo pane and look at the image quality column. If you have some images with measurements that are significantly lower than others you should remove them if possible.

Align Photos
Under the Workflow menu select “Align Photos”.
- Higher accuracy setting will take more processing time,
- If you have a large number of images (more than 100), we recommend you enable – Generic preselection option, to reduce processing time;
- Agisoft does not recommend using the parameters: Guided image matching, Adaptive camera model fitting;
- For Key point limit the recommended range of 20,000 to 100,000, start with 40,000
- For Tie point limit the recommended range of 2,000 to 40,000, start with 10,000. Setting it to zero means unlimited. This may be useful for very large objects or if you want to refine your model as much as possible.

Set the Bounding Box
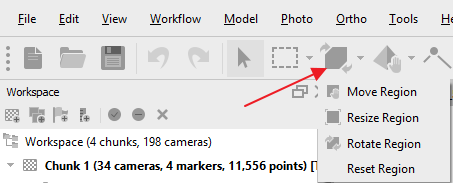
This step is critical but often overlooked. After you align your photos you will see their locations represented in the Model window. You may want to turn off the cameras depicted as blue rectangles so you can see the tie points more clearly. You will want to resize the bounding box so that is fully contains your object with as little extraneous points as possible. This will save time in rendering and cleaning the model later. To do this use the Region tools: Resize, Rotate and Rotate region. After resizing and rotating the bounding box click the select tool and rotate the model to confirm the box is properly placed. Look at the model from a few different angles to make sure it is accurate.
Build Dense Point Cloud – NOTE this step can be skipped as more recent versions rely on the depth maps rather than dense cloud to build the mesh.
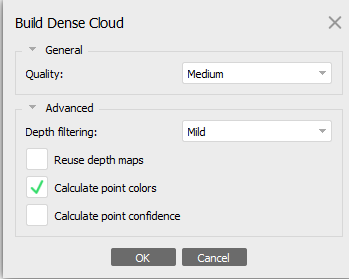
Select “Build Dense Cloud” from the Workflow menu.
- Agisoft recommends you use – Medium quality. Higher quality takes quite a long time and demands more computational resources, but allows for more detailed results generation. I recommend High quality.
- Use Mild depth filtering for smaller 3d models and Aggressive for larger projects such as buildings and landscapes.
- I would also suggest turning on the option to Calculate point colors and confidence
- This process will take a while (expect a few hours at high resolution) during which time your computer will be almost unusable.
Clean the Dense Cloud
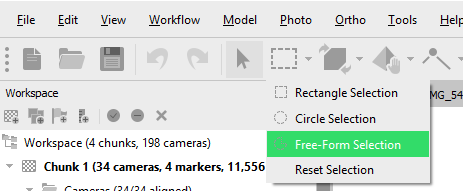
To improve the quality of your model you should now look at the dense cloud and remove any extraneous points using the selection tools on the toolbar. Make sure you are viewing the dense cloud by clicking on it in the Workspace pane. Take your time on this step. Zoom in so you can get close to the model and remove any points that are not part of your model. Continually rotate the model to find extraneous points on all sides. The free form selection tool is the most useful for this process.
Build Mesh (for 3D models only)
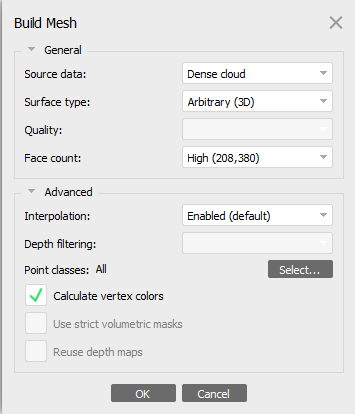
Think of the mesh as the wireframe the imagery will be covering. The more detailed the mesh the finer detail in the structure but not necessarily the image. Mesh quality is more important for 3D printing than a digital model. A mesh can be based on the dense point cloud or a depth map. Using the depth map approach “supports GPU-acceleration and mostly provides better results for the same depth maps quality for objects and scenes with big number of minor details.” To generate the mesh choose “Build Mesh” from the Workflow menu. While Agisoft recommends use of depth maps I have had better luck using the dense cloud as the source. Recommended values:
- Source data: Metashape recommends you use the Depth Maps but try Dense cloud if you don’t get good results
- Surface type: Arbitrary
- Quality: Medium (higher will give better quality but will take more processing time and generate large file sizes)
- Face count: medium (higher quality increases processing time and file size)
- Interpolation: Enabled
Build Texture (for 3D models)
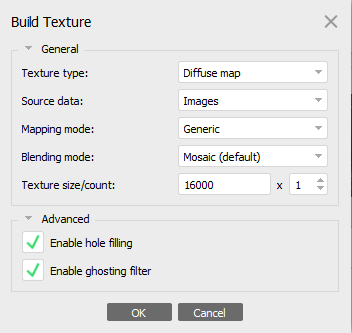
Building the texture will add the imagery to the mesh frame. This step may take quite a bit of time (a few hours at least) during which your computer will be unusable. Start with the recommended settings:
- Texture Type: Diffuse map
- Source data: Images
- Mapping mode: Generic
- Blending mode: Mosaic
- Texture size/count: 16000 X 1
- Enable hole filling and ghosting filter
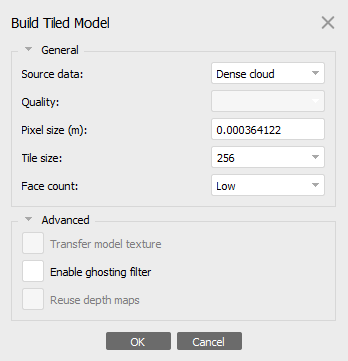
Build Tiled Model – NOTE only available in the Pro version of Metashape and not really necessary
Finally build the tiled model. This will give you the final result with the best quality. This step will take quite a bit of time (a few hours at least) during which your computer will be unusable.
Build DEM – Only available in Pro version
A DEM is a Digital Elevation Model. You should create a DEM before creating an orthophoto which is just an image that contains geographic coordinates. In the DEM settings window choose dense cloud as the source data and the defaults should be fine for the rest of the options. You could use the mesh as your data source but the dense cloud will generally give more accurate results.
Build Orthomosaic – Only available in Pro version
When building the orthomosaic select the DEM as your source and leave the other options at their defaults. You could build it from a mesh as well but using the DEM should result in a higher quality model.
Exporting a final product
To export a 3d model choose export under the file menu and choose model. We recommend saving as an obj format. This is a commonly used format that can be used to view the model online or a computer and it can also be 3d printed.
To export a DEM or Orthophoto (Pro version only) choose those options form the Export menu under the file menu. The defaults will be fine for most uses.
Advanced Options
Working With Multiple Chunks
If you move the object to take images from another angle you can try working with them in a single chunk but you may have better chunk working with separate chunks for each series of images then merging these together at the end. Work through the same steps for each chunk. Then you can add markers to points that appear across chunks and then merge the chunks based on those markers.
Adding Markers
If you have multiple chunks representing different views of your model you can add markers to align and merge them. Find a point that is visible on the dense cloud for all chunks. Right click and choose add marker. Add at least a few markers, more is better. Do this for each chunk and only add markers that are visible in all chunks.
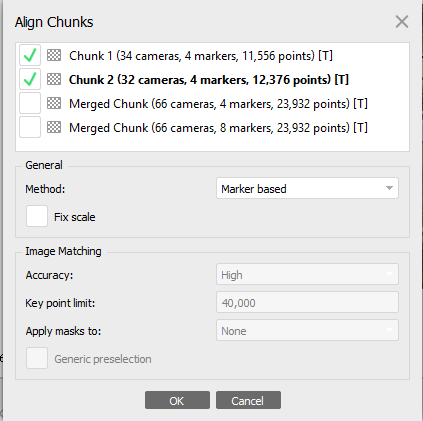
Align and Merge Chunks
From the workflow menu first choose align chunks. Select the chunks you want to align/merge and the method. You can align chunks based on Markers or let Metashape try to merge based on points. After aligning choose merge chunks from the workflow menu and select the chunks to merge. Choose which features you want to merge. If you don’t merge the dense cloud and models you will have to re create them.